
[pms-login lostpassword_url=”https://www.interactivemetronome.com/lostpassword/”]
[pms-restrict subscription_plans=”5215″]
Distributor Materials
Education
Click on the buttons below to find all the materials you will need for each course. The design files for each course are also provided for each title. You will be taken to a dropbox folder to download the needed materials. Please let us know if you need something that isn’t provided.
*Please note: The files are compatible with Adobe Creative Suite 6 InDesign, Illustrator and Photoshop.
Live Course Processes & Materials
Prior to Course
- Decide on a course date, location, and speaker
- Be sure to have speaker scheduled and prepared at least 60 days prior to course
- Once course and speaker are finalized add dates to your website, also forward dates to IM for posting online
- Advertise course at least 60 days prior
- Finalize course location within 45 days
- Coordinate shipping, if needed at least 1 – 5 weeks before course date
- Gather course materials and attendee forms for the number of registrants 1 week before
*Plan for extras just in case there are last minute registrations
**Use forms in Rep Packet Materials Tab from the Course Materials Page
During the Course
- At the beginning of the course please fill out the Sign in form with all attendee’s information. Download form.
- Have fun!
After the Course
- Send completed sign in form via email to the Education Department at education@interactivemetronome.com
- Follow up with course attendees within 1 week
Marketing Materials
The design files for each item is provided under the correlating piece in this tab. *Please note: The files are compatible with Adobe Creative Suite 6 InDesign, Illustrator and Photoshop. Email Marketing Support at marketing@interativemetronome.com if you have any problems with any of the files.
Tradeshow Processes & Materials
Processes
- Register to Present
- Find Provider in area to present
- See what AV equipment is needed to present
- Register to Exhibit
- Decide who is exhibiting
- See if Tables, Chairs and Electric are needed- order what is needed
- Decide if advertising in program
- Decide on lead retrieval system- Check if you need custom qualifiers
- Decide if doing a giveaway
*Be sure to include an order form for the giveaway, to keep track of the customer - Send badge information for the representatives attending the show
- Determine the materials & equipment to be sent at least a month before the show
Tables
- One starbase round high-top table (40″³ high)
- One 4″² x 30″³ table
*Depengdin on the size of the show, ordering a 6″² table is better than the 4″².
Carpet & Padding
- Many convention centers do not have carpet in the exhibition area; therefore, it is a good practice to order a carpet that is measured the same size as your booth.
- If the show is held at a hotel, you might be able to get away without ordering carpet.
Lead Retrieval
- Some shows offer a lead retrieval device. This will help you keep track of potential sales leads, especially at a larger show.
- Smaller shows don’t always off this service. For these shows be sure to send an “I want more info” form.
*You can customize the form based on your needs.
Electric
- Order enough electricity to power all the equipment you plan to use, for US shows 5 amps, 500 watts should suffice.
*Remember you can bring your own surge protectors and extension cord.
*You can order all of the above furnishings and services from the show management company, in the exhibitor services kit.
Shipping & Material Handling
- You can use a carrier you are familiar with, but often times its good practice to use the designated shipper for the show. They often guarantee shipment arrival times.
- Regardless of the shipment method you choose you will have to provide a material handling form along with any fees associated. This ensures your materials will be at your booth ready to be set up.
Credit Card Authorization Form
- If you plan on ordering anything from the show’s management
company, you will have to submit a credit authorization form.
*Be sure to keep track of expenses, so that you are not over charged.
Equipment
- Computers (Large show ““ 2; Small show ““ 1)
- IM Stations (Large show ““ 3; Small show ““ 2)
- MCUs (Large show ““ 3; Small show ““ 2)USB Cords (Large show ““ 6; Small show ““ 4)
- Splitters (Large show ““ 3; Small show ““ 2)
- Wired Tap Mats or Tap Mat Adapter (Large show ““ 3; Small show ““ 2)
- Wired Button Trigger (Large show ““ 3; Small show ““ 2)
- Tap Mat (Large show ““ 6; Small show ““ 4)
- Button Trigger (Large show ““ 6; Small show ““ 4)
- In Motion Transmitters (Large show ““ 6; Small show ““ 4)
- In Motion Insoles (5)
- Headphones (Large show ““ 3; Small show ““ 2)
- Wireless Headphones (Large show ““ 2; Small show ““ 1)
- External Speakers (Large show ““ 2; Small show ““ 1)
- Hand Straps (1 Large, 1 Small per station)
- Ankle Straps (2 per station)
- Extra Batteries for triggers and external speakers
- IM-Home Setup with Box
*This is a list of suggested equipment, add/subtract based on your needs.
Materials
- Brochures
- Adult (Large show ““ 300; Small show ““ 200)
- Pediatric (Large show ““ 300; Small show ““ 200)
- IM-Home (Large show ““ 100; Small show ““ 50)
- IM Universe Flyer (Large show ““ 100; Small show ““ 50)
- Certification Course Schedule Flyer (Large show ““ 100; Small show ““ 50)
- DVBIC Research Study (Large show ““ 50; Small show ““ 50)
- AJOT ADHD Research Study (Large show ““ 50; Small show ““ 50)
- “I want more info” forms (at least 50)
*Shows without lead retrieval - Resource Binder
*See Resource Binder tab for contents - Case Studies
- Adult (2 Different Studies, 50 each)
- Pediatric (2 Different Studies, 50 each)
- Order Forms (at least 10)
*You can keep them in a binder or folder to keep organized - Manuals
- IMC Manual (1)
- Pediatric Best Practices Manual (1)
- Cognitive Skills Manual (1)
- Motor Skills Manual (1)
- Fall Risk Reduction Manual (1)
*This is a list of suggested equipment, add/subtract based on your needs.
Booth & Misc.
- Banner
- Tablecloth
- Brochure Rack or Brochure Stands
*Size based on show size - Basket for giveaway
- Giveaway sign
- Business Cards and holder
- Promo Items
- Pens and holder
- Power Strip
- Extension Cords
- Scissors
- Packing Tape
- Gaffing Tape
- Cable Ties
*This is a list of suggested equipment, add/subtract based on your needs.
*Don’t forget to schedule return shipping, whether it’s with the show’s designated shipper or an alternative method, make sure you have labels created.
Resource Binder
The Resource Binder can be a very good tool for courses and tradeshows.
Its advisable to use at least a 3 inch binder to accommodate all the content while still having room to add more when new material is available.
The binder should be divided into 6 sections:
- Research: This section will provide a title and synopsis of each IM research study along with its author, year published and publication. In addition this section also lists the IM Research References and Supporting Research References.
View Research - Case Studies – Pediatric: This section is divided by diagnosis with at least 2 copies of each case study that can be passed out and/or copied. For most up to date cases, each study can be downloaded from the Success Stories page.
- Case Studies – Adult: This section is divided by diagnosis with at least 2 copies of each case study that can be passed out and/or copied. For most up to date cases, each study can be downloaded from the Success Stories page.
- Case Studies – Sports: This section is divided by diagnosis with at least 2 copies of each case study that can be passed out and/or copied. For most up to date cases, each study can be downloaded from the Success Stories page.
- Provider of the Month: As you may know every month we feature a provider, who we’ve dubbed “Provider of the Month”. They are generally feautured in the month’s eNews, posted in a blog and included the printed version for the Resource Binder.
- Flyers: This section is comprised of a variety of flyers, including education cut sheets, marketing flyers and any other flyer that you think is important to add to your binder.
*Be sure to keep track of what is passed out, to replace once the event is over. Download Resource Binder Tracking Spreadsheet. You can update this file as new content becomes available.
*As new materials become available you will be notified via email.
More Media & Testimonials are located in the Business Development Toolkit. which is located in the Provider section of our website. You’ll need your username and password to access that area. *This login info is different from what you used to access this page.
Business Development Toolkit
Once providers register for a course they get a username and password that will give them access to the provider only section of the site. After they login they will see a page that looks like this.
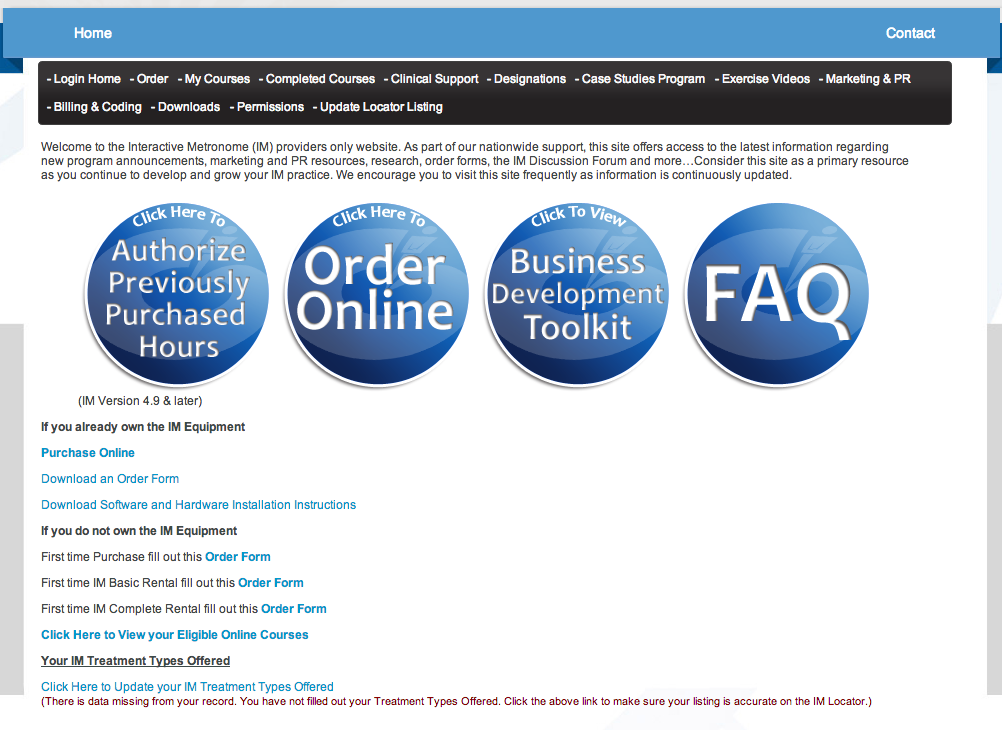
Instruct providers to click on Business Development Toolkit where they will have access to the marketing page.
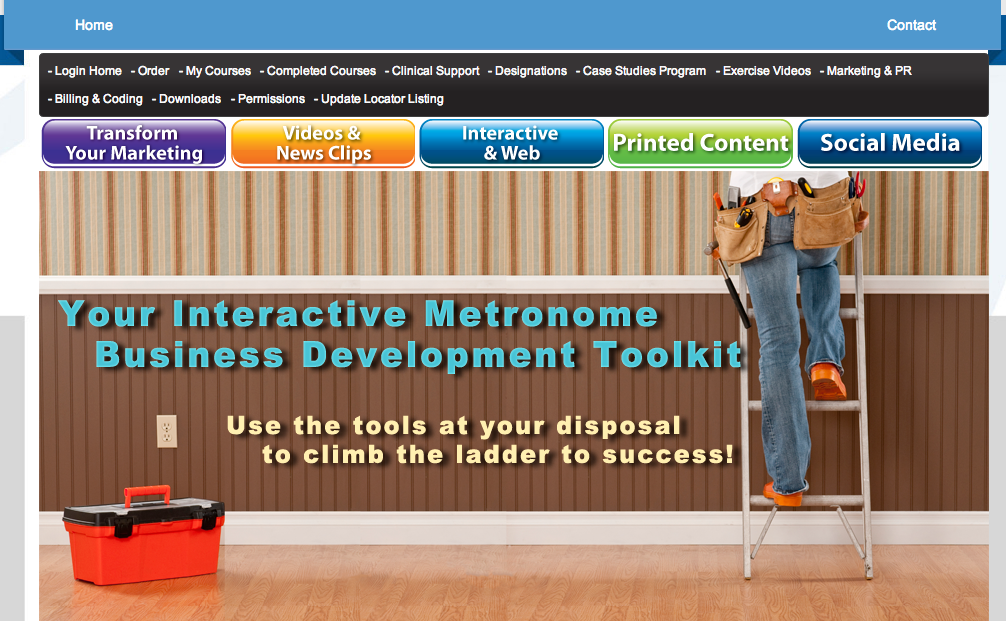
They can choose from the following:
*Click on the images below to access each page.

This page allows providers to watch Marketing 101 videos and learn what it takes to build a successful practice.
Refer providers to the videos page so they can promote their IM services with professionally made video clips and news clips. All they have to do is cut and paste the code into their website.

Providers can choose from wallpapers to decorate their desktop, banners to advertise on their website and email campaigns to drive people to their door.

We provide numerous flyers, brochures, postcards, referral cards and banners to hand out or display at a tradeshow. Providers can choose from the provided IM stock images and logos to customize their own marketing pieces.

Social media provides an opportunity to reach clients and professionals on a personal level. This section helps providers get their business on the social sphere so they can communicate their mission and goals.
Technical Support
The design files are provided for each piece in this section, simply click on the Technical Support button at the bottom of this section. *Please note: The files are compatible with Adobe Creative Suite 6 InDesign, Illustrator and Photoshop.
Set-up Instructions
Computer Requirements
IM Pro Universe works on a PC or Intel Based Mac & eClinic features require an Internet connection.
Windows-Based Computer Requirements
Minimum Requirements:
- Operating System ““ Windows 7, Service Pack 1
- Processor ““ Intel Core “ix” Family (i3, i5, i7), AMD Phenom II or better
- Processor Speed ““ 2.0 GHz or better
- RAM ““ 4 GB or more
- Internet Connection ““ 56 Kbps modem or faster
Note: Only the IMPro Universe eClinic features require an Internet connection.
Apple OSX-Based Computer Requirements
Minimum Requirements:
- Operating System ““ OSX 10.7
Note: iOS devices are not compatible with IMPro Universe - Processor ““ Intel Core “ix” Family (i3, i5, i7), AMD Phenom II or better
- Processor Speed ““ 2.0 GHz or better
- RAM ““ 4 GB or more
- Internet Connection ““ 56 Kbps modem or faster
Note: Only the IMPro Universe eClinic features require an Internet connection.
IM Pro 9.0 Help Guide
Computer
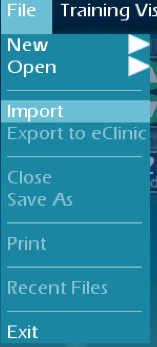
Importing a previous IM Member file (.imd) into IM Pro 9.0
1. Open the IMPro Universe Software, and select “File” and then “Import” from the top, left corner.
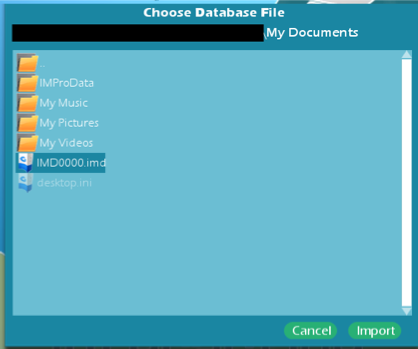
2. Select the Original Member’s file (.imd) and select “Import”.
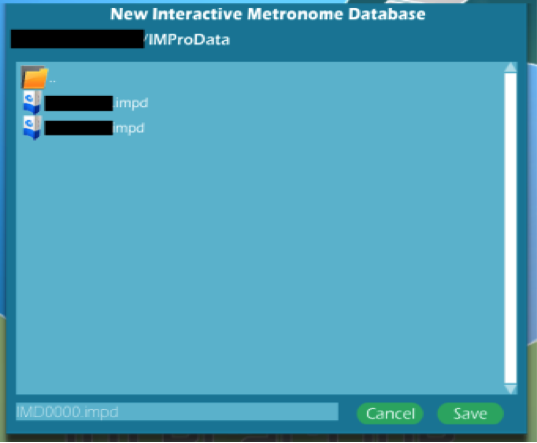
3. The new member file will appear (.impd). Select “Save”.
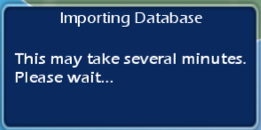
4. Your members information will now import into IMPro Universe. Once it I finished, your file will be opened.
Creating a New Member File on Computer
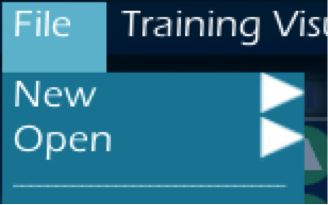
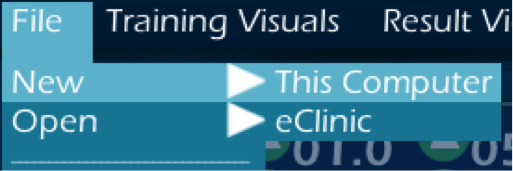
1. Open the IMPro Universe Software, and select “File” and then “New” from the top, left corner.
2. Select “This Computer”.
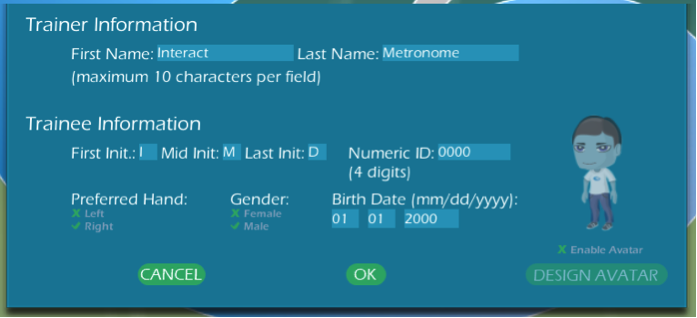
3. Fill out all the information that is asked of you in the File Creation Screen. If you are not using an Avatar, then press “OK” and proceed to step 5.
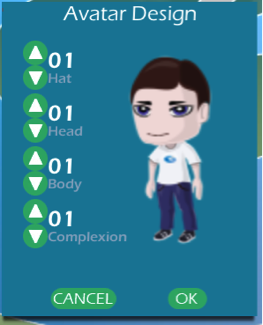
4. If you selected “Enable Avatar” you will be presented with the Avatar DesignThe gender of the avatar will be based off the gender designated in the File Creation Screen. Once you are finished, press “OK”.
5. Unless you have a preferred folder for your IM files, simply verify the file name and select “Save”.
Opening a New Member File on Computer
1.Open the IMPro Universe Software, and select “File” and then “Open” from the top, left corner.
2.Select “This Computer”.
3.Select the saved file you wish to use, and select “Open”.
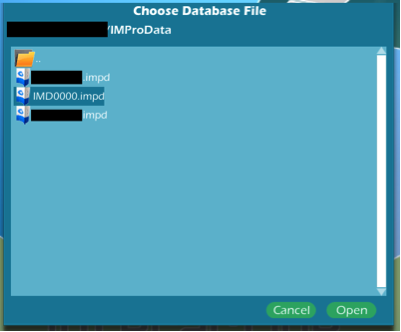
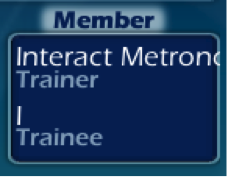
4.Your members information will appear on the right of the screen letting you know the correct file is open.
Purchasing Hours Online
Purchasing Hours and Authorizing Hours are two separate steps Online Hours Purchasing Instructions:
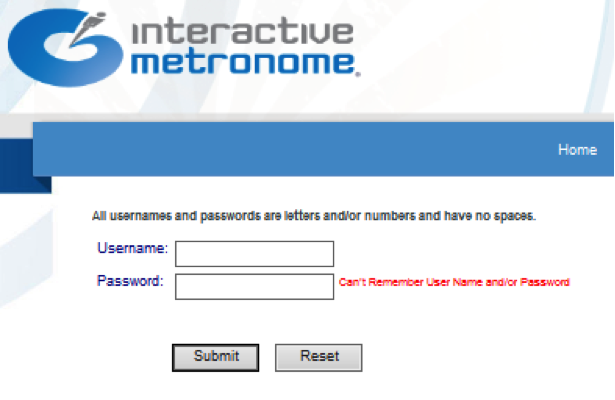
1. Login to the Interactive Metronome Provider Site: Copy the following link into your web browser: https://secure.interactivemetronome.com/NetSite/IM/ProviderLogin.aspx
2. To purchase hours online login with your Provider User ID and Password
NOTE: If you do not recall your user id and password you may contact technical support to obtain it or click the link labeled “Can’t Remember User Name and/or Password” and an email will be sent to you.
3. Once successfully logged on, Click the Large Blue Button labeled “Order Online”

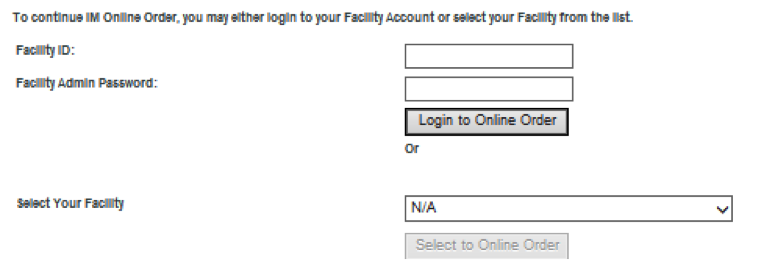
4. Select your Facility Name from the drop down list if it is not already populated and click the box labeled “Select to Order Online”
5. Locate the “Hours” Reload Hours Section and enter the amount of hours you wish to purchase
NOTE: There is a 10 hour $100 minimum order
6. Click the Add To Cart Box

7. Click the Proceed to Checkout Box
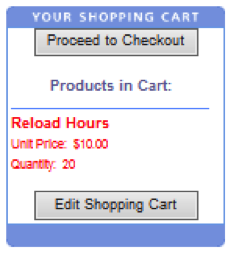
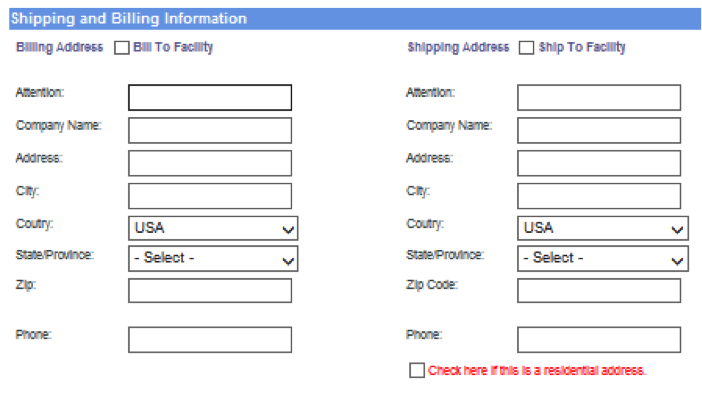
8. Click the Bill to Facility Box and Ship to Facility Box
NOTE: nothing will be billed or shipped in this instance but it is required
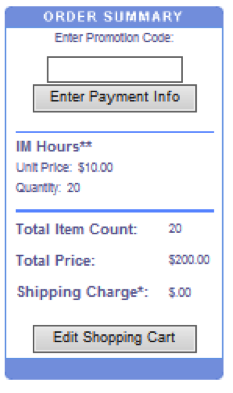
9. Click the Enter Payment Info Box
10. Enter your Method of Payment and card details, check your order for accuracy
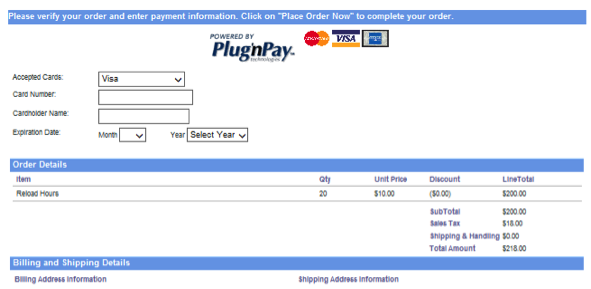
11. Click the Place Order Now box
12. An invoice for your purchase will be displayed if the transaction has successfully processed. Authorizing Hours once they have been successfully purchased.
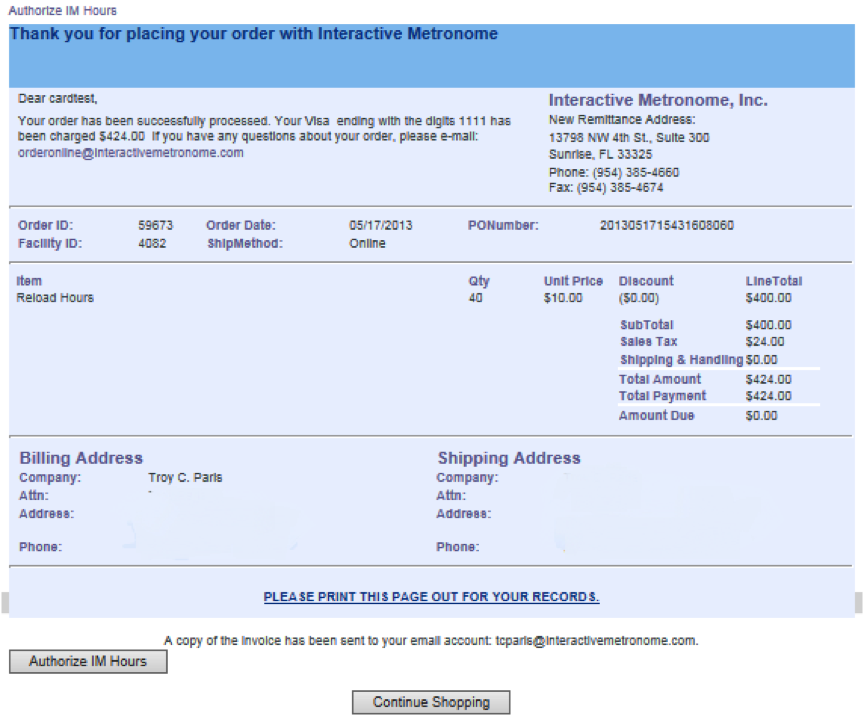
Authorizing Hours Online
1. At the bottom of the invoice page to the left side Click the Authorize Hours Box to load the hours that you have just purchased onto the MCU.
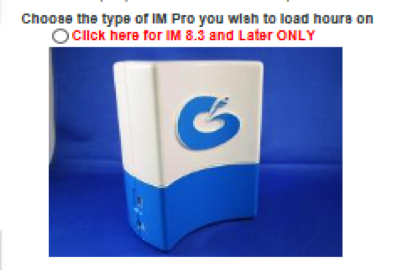
2. You must select the type of MCU that you are currently using
– Click here for IM 8.3 or Later ONLY
3. After selecting your MCU type, at the bottom of this page you will be required to input important information from the screen below:
NOTE: AT THIS POINT YOU SHOULD HAVE YOUR MCU CONNECTED AND YOUR IM PRO SOFTWARE OPENED TO THE OPTIONS> AUTHORIZE HOURS MENU WHERE YOU WILL FIND THE INFORMATION NEEDED TO ENTER INTO THE FIELDS DISPLAYED ON THE WEBPAGE

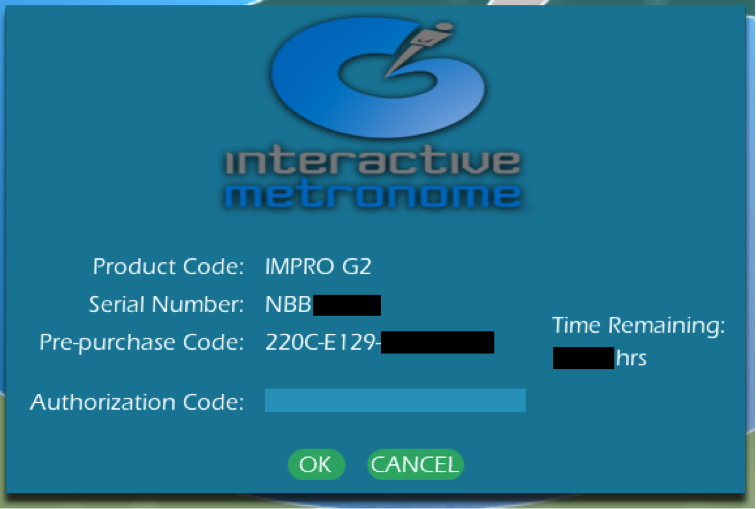
NOTE: DO NOT USE THE SERIAL NUMBER AND PRE-PURCHASE CODE IN THE ABOVE EXAMPLE ““THEY ARE JUST FOR DEMO PURPOSES. YOUR CODES ARE OBTAINED FROM YOUR SPECIFIC SOFTWARE AND HARDWARE
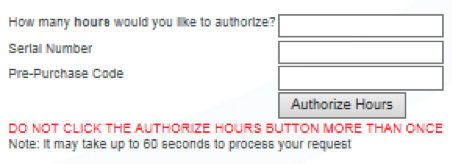
“¢ How many hours would you like to authorize? You may choose any amount as long as it does not exceed what you have available in your hours bank.
“¢ Serial Number- To Obtain YOUR SERIAL # Open your IMPro Software and Select Options> Authorize Hours
“¢ Pre-Purchase Code- To Obtain YOUR PRE-PURCHASE CODE#
4. Once you have completed the above steps click the Authorize Hours Box (please click this box ONLY Once)
5. You will be taken to the Authorization Code screen where you will be provided the Authorization Code
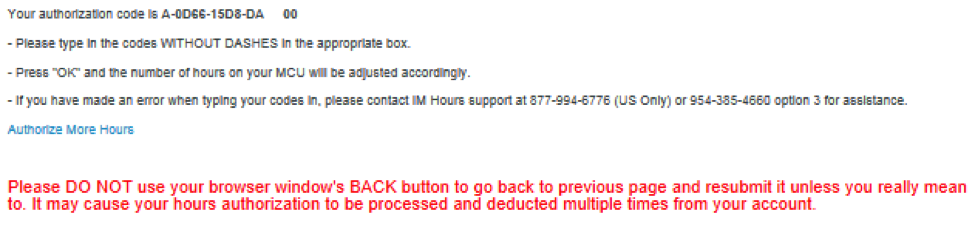
6. Take down the code and enter it in the field provided in the IM Pro program with the MCU connected where you obtained the Serial number and Pre-Purchase Codes
“¢ Do not use the authorization code in the below example- IT WILL NOT WORK!
“¢ Type the code without dashes or spaces exactly as given and then click the OK button and the time will be added to your MCU
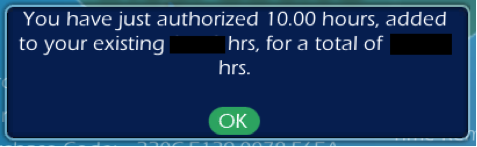
“¢ A message will inform you that you have just authorized “X amount of time” added to your existing time
If you would like assistance you may contact IM Technical support for a walk through of the procedures at support@interactivemetronome.com . We encourage you to learn the process as it will allow you to purchase and authorize hours during times when the IM offices are closed.
Adjust Avatar Settings
1. Select “Options” and then “Avatar Settings” from the top menu to bring up the Avatar Design screen.
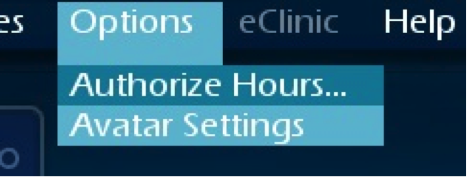
2. Use the up/down arrows to change the various settings on your IM Avatar. You may also change the gender of your IM Avatar, and enable/disable them for use during IM training.
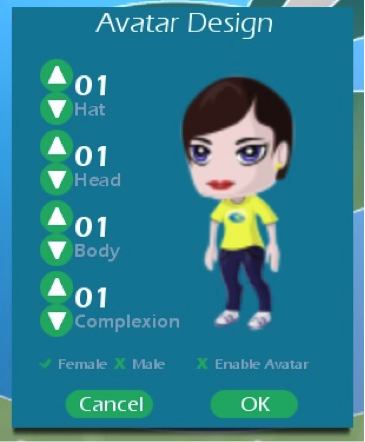
3. Select “OK” when you’ve made all the necessary changes.
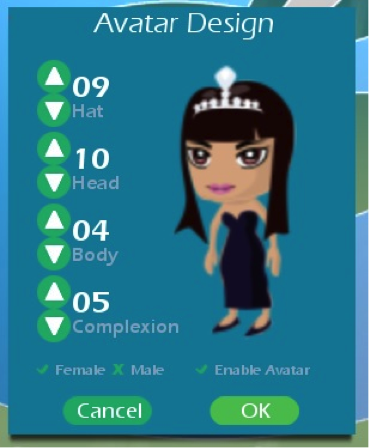
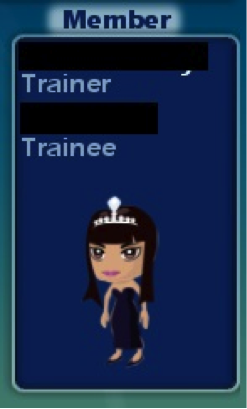
4. If you selected “Enable Avatar” , they will appear underneath the Member area of the IM Universe.
Changing the Visual Screen
1. Please make sure the IM Universe is set to “Regular Training”.
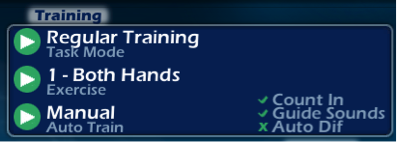
2. Select “Training Visuals” from the toolbar.

3. You will be presented with the “Visual Training Screen”.
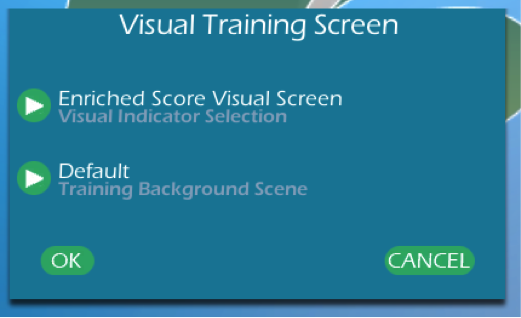
4. Click the arrow to the left of “Default” to reveal the visual backgrounds for IM Universe.
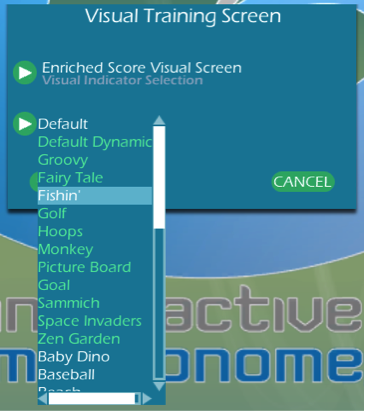
5. Once the background has been chosen, it will appear on the “Visual Training Screen”.
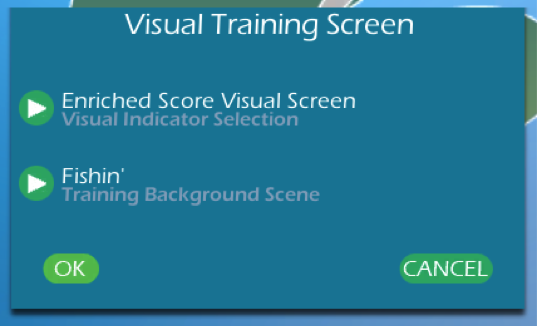
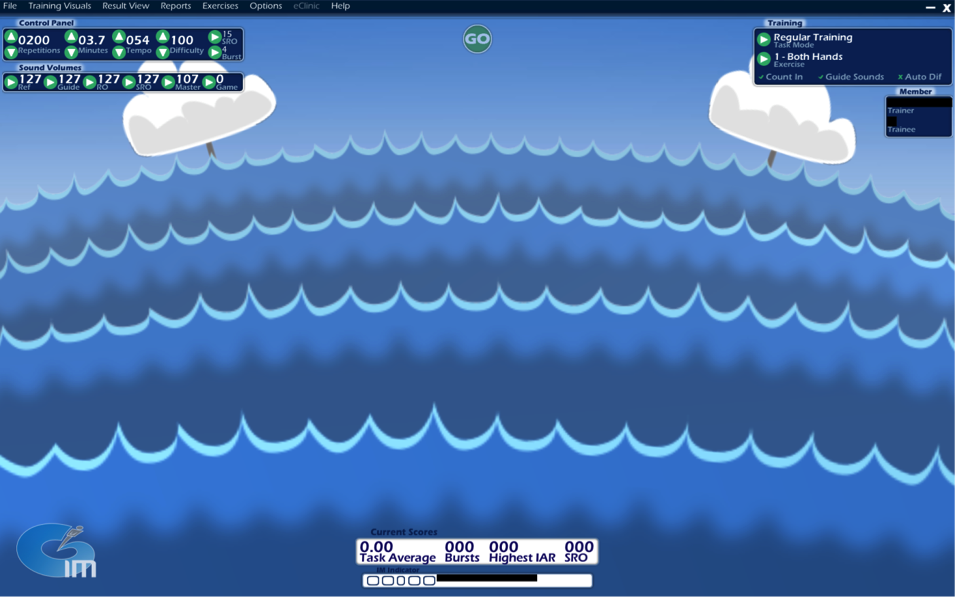
6. Select “OK” and the IM Universe background will appear changed to the appropriate selection.
eClinic
Creating a New Member File in eClinic
1. Open the IMPro Universe Software, and select “File” and then “New” from the top, left corner.
2. Select “eClinic”
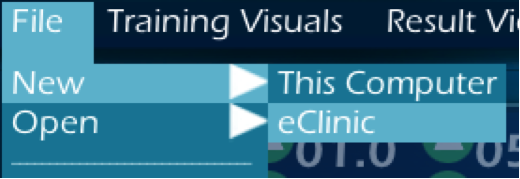
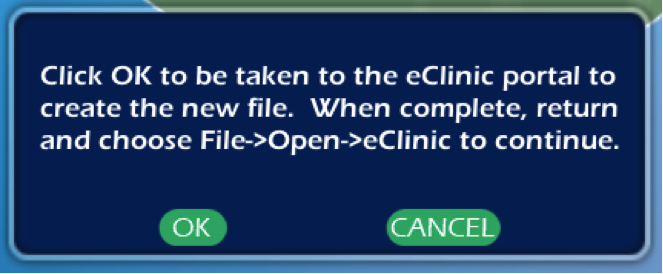
3. You will be prompted to create the eClinic file online. The program will minimize and open the Interactive Metronome eClinic.
Note: Files created through this method will only function with IM-Pro Universe software. In order to use the eClinic file with the IM-Home Universe software, an IM-Home must be purchased and authenticated online. This will link the two programs together for your member.
Opening a New Member File in eClinic
1. Open the IMPro Universe Software, and select “File” and then “New” from the top, left corner.
2.Select “This eClinic”.
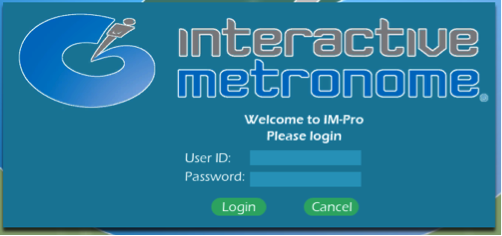
3. You will be prompted to log into the eClinic using your members User ID and Password you previously created online.
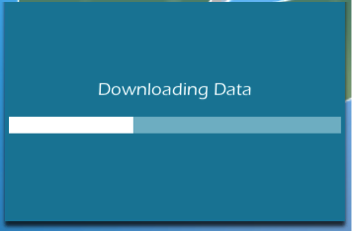
4. Your member’s eClinic training plan will synchronize with the IM-Pro software. This may take a few seconds.
5.You should now see your eClinic training plan ready to be used.
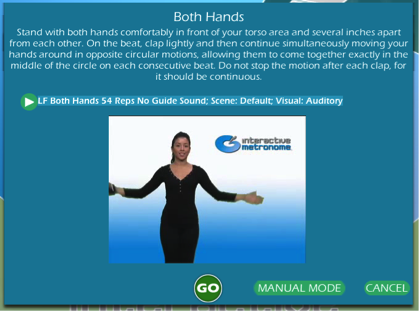
Switching Between eClinic Training Plan and eClinic Manual Mode
1. Open the eClinic File
NOTE: If you do not know how to Open the Member file see “Opening a New Member File in eClinic” instructions
2. eClinic Manual Mode will allow you to perform any IM exercise of your choosing, while still keeping all your data together. To start, select “Manual Mode” from the Training Plan Screen.

3. Your training parameters will look as follows.
4. From here you can choose any IM exercise or Assessment to perform with your member
Note: Custom Exercises are not permitted while in eClinic Manual Mode
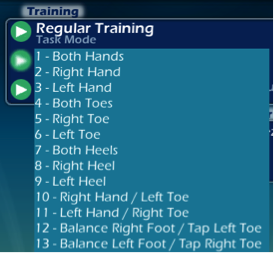
5. To switch back to your eClinic Training Plan, simply select the option within your training parameters.
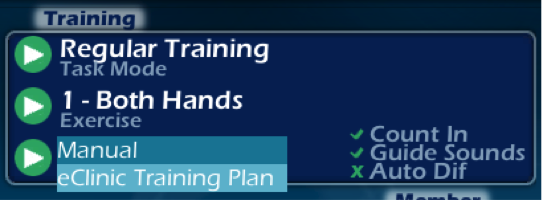
6. You should now see your eClinic training plan ready to be used once more.
Exporting Local Files to the eClinic from Computer
NOTE: This feature is to be used when Your In-Clinic client purchases an IM-Home and you want his training data to reside in the same file.
1. Open the Member File
NOTE: If you do not know how to Open the Member file see “Opening a New Member File on Computer” instructions.
2. Open the IM-Pro Universe Software, and select “File” and then “Export to eClinic” from the top, left corner.
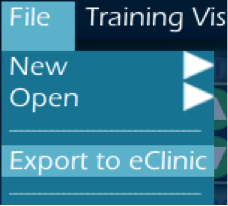
3. You will be prompted with an eClinic warning. Press “OK” to proceed.
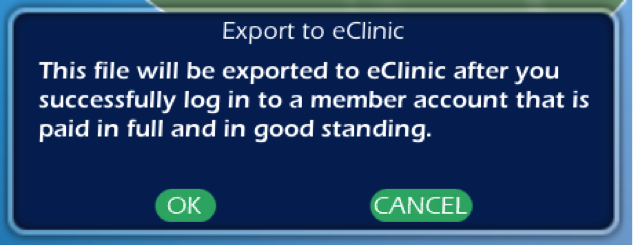
4. Use the User ID and Password for the eClinic member you wish the data to be exported to.
WARNING: This process is irreversible. Proceed at your own risk.
5. If you have successfully logged into the eClinic, your data will begin to export and you will see the following progress bar. This may take several seconds to complete.
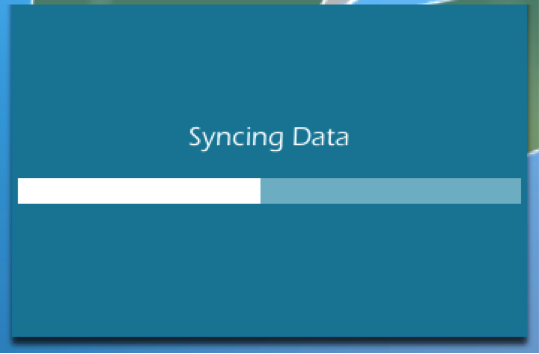
6. Once the data has been exported to the eClinic, you will be prompted with your eClinic Training Plan.
7. If no new data is uploaded, you will receive the following message.
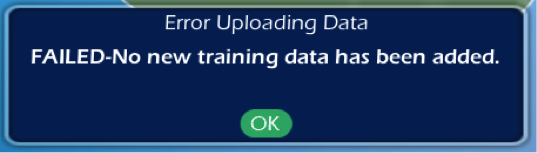
Frequently Asked Questions (FAQ)
What is the maximum number of hours that can be stored on the Master Control Unit?
- The maximum number of hours is 400.
How do I attach training files to an email message sent to Support?
- First close the IMPro Software.
- Start your email application and create a new mail message addressed to support@interactivemetronome.com. The subject line should
read “Provider Training.” - Type in any issues or concerns you want to addressed to the support staff in the text box.
- Click either “Insert” or “Attach” from the message box’s menu toolbar.
- Navigate to the file location and select “OK”.
- The file will now be attached to the email.
Why are some reports and/or graphs not available whenever I try to get one?
- The file does not contain previous data with which to compare. By design, in order to generate analysis and comparison reports, there must be previous data (from separate days) in the file to compare to the current session. If the current session is the first time tasks in a particular training mode were performed, then there will not be previous data with which to compare.
- If no LFA tasks were previously recorded, then there is no data with which to compare for the Regular Training Comparison with First LFA.
- Short Form Test tasks performed during the same session will not be adequate for comparison. Only data recorded on separate days can be compared.
The dates are reversed in my data file and sometimes I get a "syntax error" after I have completed an IM task or exercise. Why does this occur?
- This is only an issue for international providers. The “Your locale (location)” setting of “Regional Options” of the operating system is defaulting to a location that supports a different date format than that required by the IM program (d/m/yyyy or dd/mm/yyyy). Change the “Your locale (location)” setting of the “Regional Options” of the operating system to a location that supports the date format required by the IM program.
I would like to purchase and load hours onto the Interactive Metronome.
a. Purchasing hours and loading hours are two different steps.
b. Purchase Hours online:
-
- Go to https://www.interactivemetronome.com/
- On the top right corner, select “Provider Login”
- Log into the website with your Provider ID and Password.
- In the black toolbar, select “Order”
- Select your facility from the dropdown box and “Select to Online Order”
- Add the hours to your cart and proceed to checkout.
c. Authorizing Hours once they are purchased:
- Go to https://www.interactivemetronome.com/
- On the top right corner, select “Provider Login”
- Log into the website with your Provider ID and Password.
- Select the center banner to “Authorize Previously Purchased Hours”
- Select your facility from the dropdown box and “Select to Online Order”
- Select the IMPro 8.3 system using the image selection.
- Follow the on screen instructions:
- Make sure your MCU is connected.
- Open the IMPro software.
- Select “Options” from the toolbar at the top.
- Select “Authorize Hours” from the list of options.
- Leave this screen open and type the “Serial Number” and “Pre-Purchase Code” (from the IMPro software) to the website in their respective fields.
- Add the correct number of hours to be authorized in the top field.
- Press “Authorize Hours” and the website will refresh with your “Authorization Code”
- Enter this code into your software, press “OK” and the number of hours on your MCU will be adjusted accordingly.
How do I make sure the batteries last as long as possible?
- Unplug the USB cable from the computer when the MCU is no longer in use. This will ensure that you get the optimum battery life from your batteries.
My triggers are not registering at all.
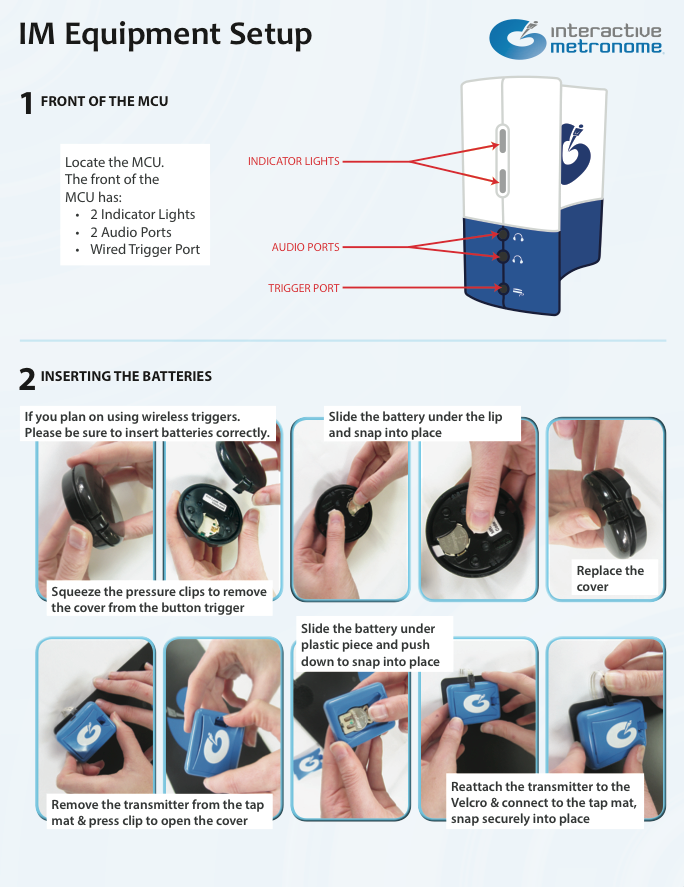
- The battery life for the Interactive Metronome Button Trigger and Tap Mat Transmitter is approximately four weeks.
- Please make sure to remove and discard the current battery, and install a new battery into the IM Sensors.
- Battery size is CR2032.
- Please use provided battery instructions for proper removal and insertion of the batteries.
My triggers are registering inconsistently. I noticed some hits miss during the session.
- Possibility One:
- The IM Sensors are running low on battery, and will soon need to be replaced.
- Possibility Two:
- The Interactive Metronome MCU is placed on the desk in such a way that it is difficult for the wireless receiver to function properly.
- Please make sure that the MCU is not near the monitor of the computer or laptop, and is positioned towards the front with the lights facing the client.
- Possibility Three:
- Specifically for a Button Trigger: Please make sure that the client is hitting the trigger as close to the center as possible. If the extreme edge of the Button Trigger is being hit, it may not register with
the system. - Specifically for Tap Mat:
- Please make sure that there is a solid surface underneath the Tap Mat. Carpeting that is too plush will cause the Tap Mat to register sporadically.
- Please make sure that the Tap Mat is at an optimal position, which is at 45o from the MCU. The range for the Tap Mat Transmitter is approximately 15 feet, so this can be achieved by pulling back the Tap Mat until the desired angle is reached.
- Specifically for a Button Trigger: Please make sure that the client is hitting the trigger as close to the center as possible. If the extreme edge of the Button Trigger is being hit, it may not register with
My Tap Mat is registering two hits. One is good, but the second is in the red.
- This is most commonly found with technique. The unique design of the Tap Mat allows for full pad sensitivity. It is accurate enough to detect the slightest roll in a person’s foot, even as they lift it off the pad. To avoid the double hit, the client must use a marching motion when stepping on the Tap Mat. The client must come straight down on the pad, and lift their foot as quickly and straight up as they can. This will
reduce and/or eliminate the “double hits” altogether.
"My program says 'MCU not connected'.
- Please make sure your MCU has two blue lights displayed on the front.
- If you have a different set of colors for your MCU lights, please disconnect it from the USB, wait a few seconds, and reconnect it to your computer.
- If your MCU has no lights displayed, it is not receiving any power from the computer. Please connect it to another USB port on the same computer, or connect it to another computer and test its functionality.
My MCU has a strange sound following the Reference/Guide Tone.
- This is a buildup of static in the headphone jack of the MCU. Follow these steps to remove the static.
- Remove the USB cable from the back of the MCU.
- Remove the headphone from the front of the MCU.
- Touch the metal tip of the headphone jack with your fingertips.
- Reconnect the headphones to the MCU.
- Reconnect the USB to the back of the MCU.
Additional Materials & Resources
Helpful Links
IMPro Universe Software Features
Learn how to navigate the new IMPro Universe software.
Coaching Programs/Certifications
Email Marketing at marketing@interativemetronome.com if you have any problems with any of the files.