Support
Interactive Metronome® is dedicated to supporting our Providers every step of the way. We can assist you with course registration, product setup & troubleshooting, business development and IM training. If you have any issues, please do not hesitate to contact us with your questions, comments and concerns.
Contact Us
Clinical Support:
Questions regarding educational resources and IM training help, please email clinicaled@interactivemetronome.com.
(954) 385-4660, ext 6
Education Support:
Questions regarding Certifications, Webinars & OnDemand courses please email education@interactivemetronome.com.
(954) 385-4660, ext 5
Technical Support:
Questions regarding IM hardware and software, please contact
support@interactivemetronome.com
(954) 385-4660, ext 5
Need help from another Department?
Dial (954) 385-4660, then press desired option
| Department | Option |
|---|---|
| Sales | 1 |
| Technical Support Education Support Hours Authorization | 5 |
| Clinical Support | 6 |
| Marketing | 7 |
| Accounting | 8 |
Setting Up and Installing Interactive Metronome
Setting Up and Installing IM-Home
*The following steps are shown on a PC running Windows 10 using the Microsoft Edge web browser.
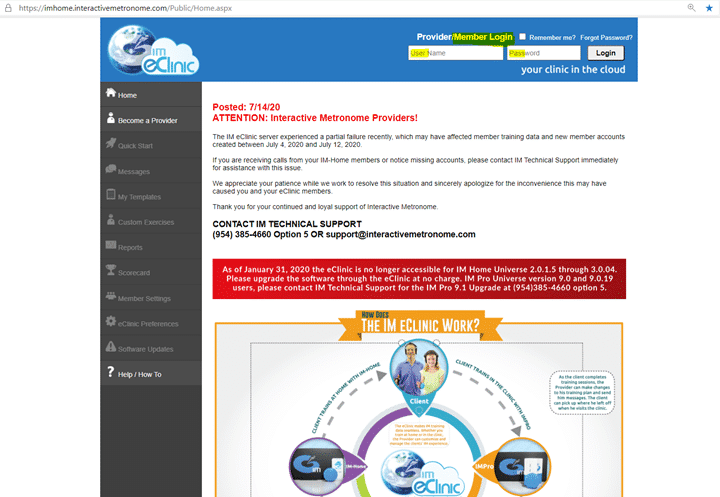
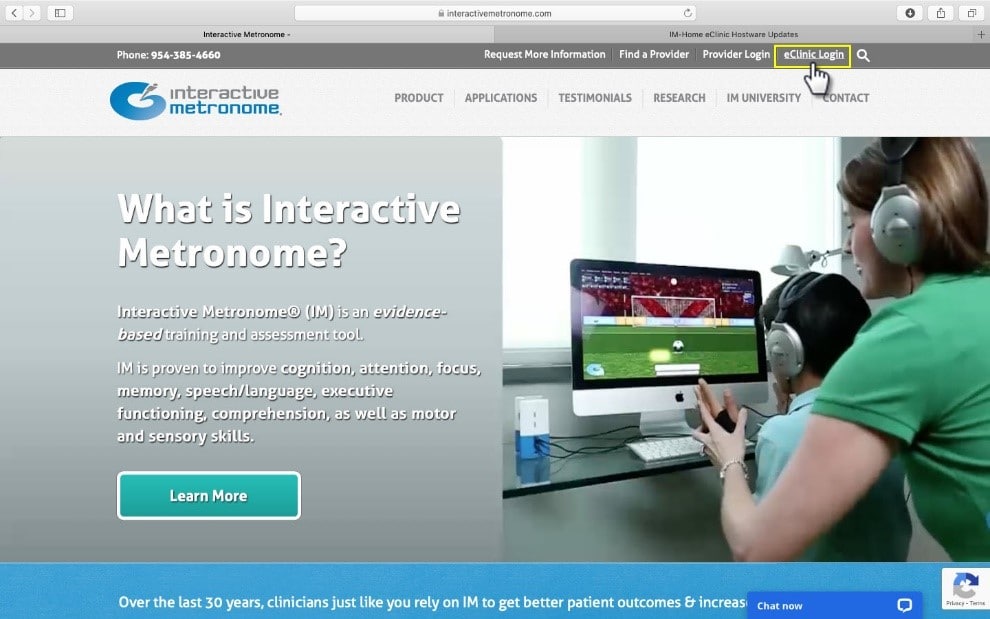
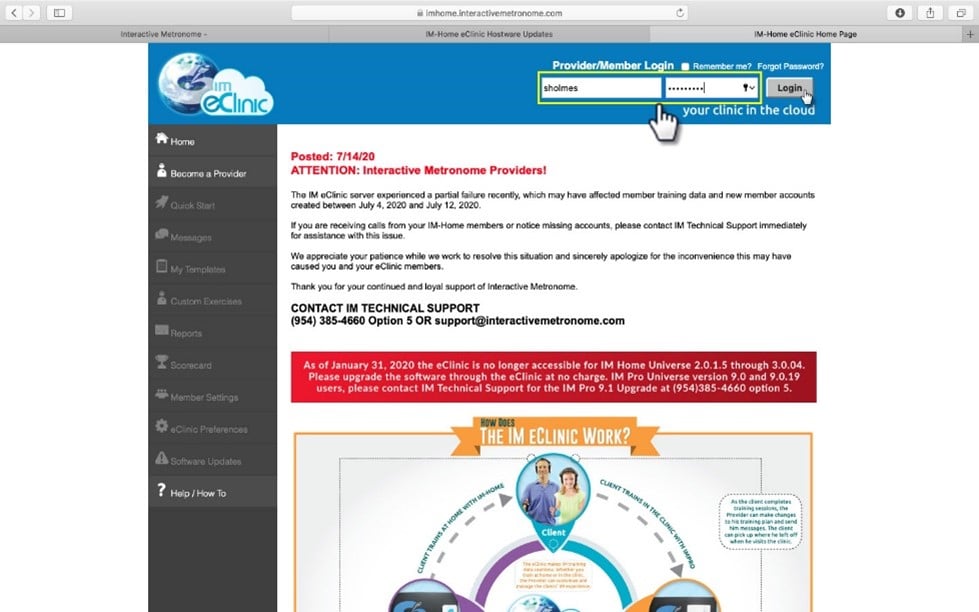
1. Login to the Interactive Metronome e-Clinic website using the Username and Password that was either supplied by your IM provider or created during your IM Home equipment purchase.
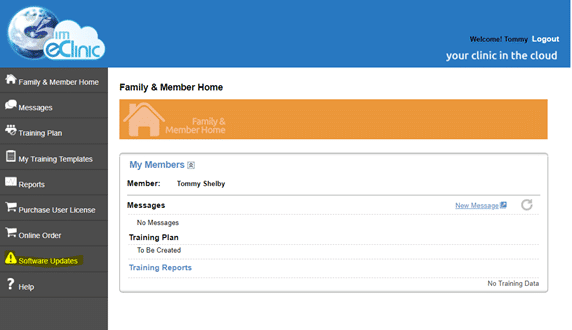
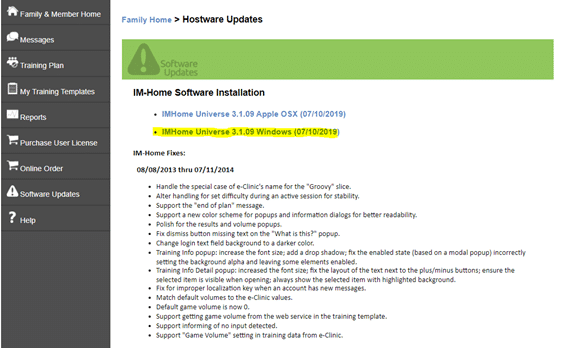
4. Your download will usually appear in the lower right corner of the screen (taskbar)

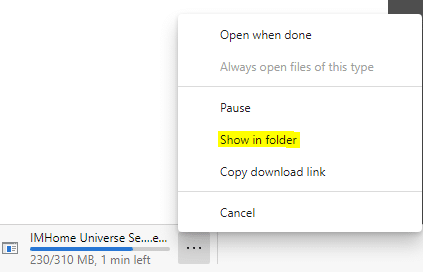


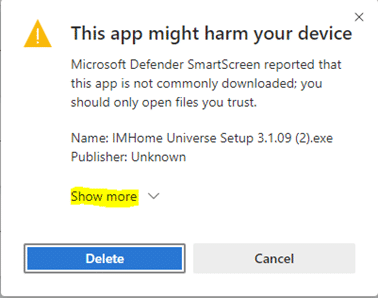
6. Click “˜Keep anyway’
7. You should now be able to click the IMHome Universe Setup 3.1.09.exe file

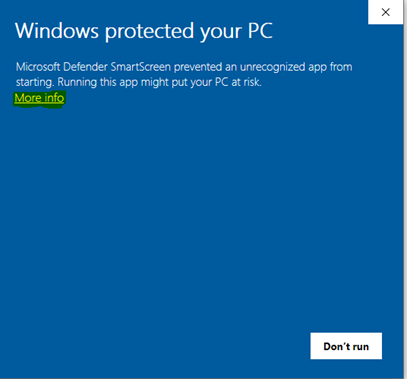
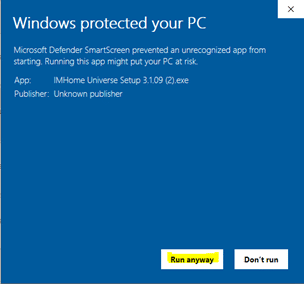
10. Accept the License Agreement to begin your installation.
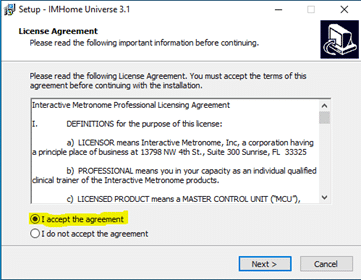
11. Click next to proceed with the installation.
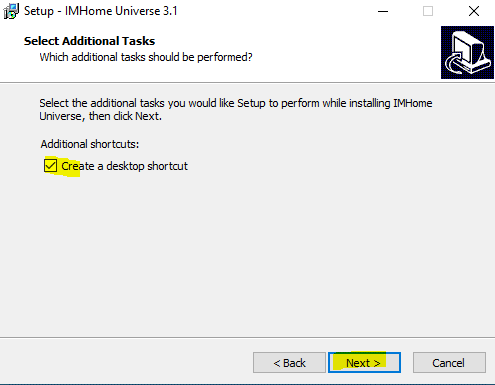
12. Click Install to proceed.
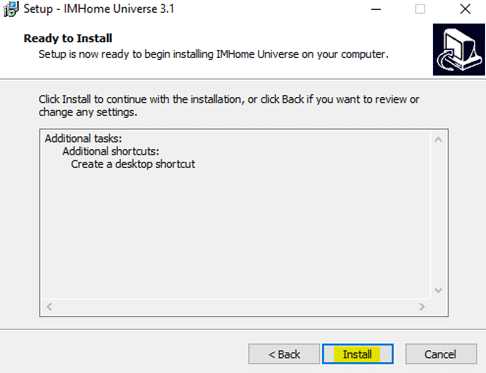
13. The install will begin extracting and copying files.
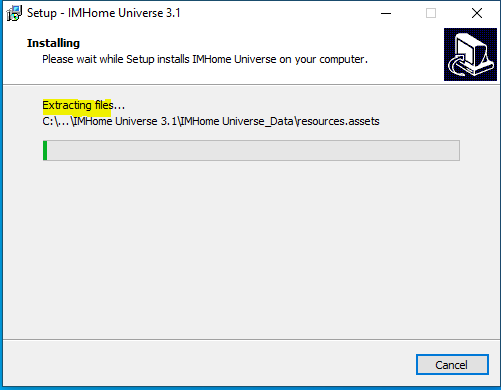
14. Once files have been installed you will be prompted to finish and exit setup. The option to Launch IMHome Universe will be selected by default. Click FINISH
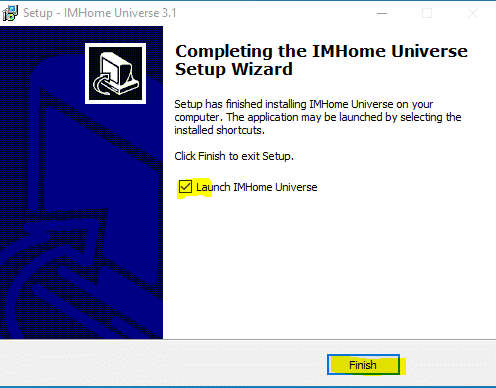
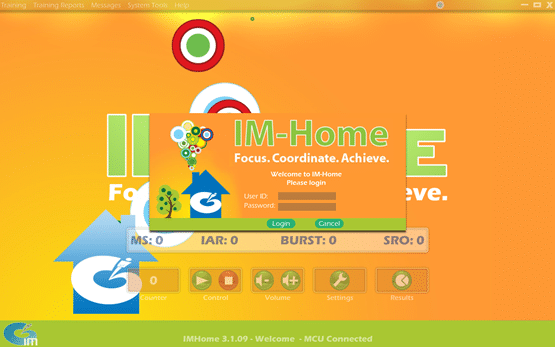
CONGRATULATIONS! Your IMHome Software has been successfully installed! The application will open to the IMHome interface. Follow the Quick Start Guide that came with your equipment to login and authenticate your IMHome User License.
1. Login to the IM E-clinic website
2. Enter the ID/PW issued by your IM provider or the one created during your online purchase
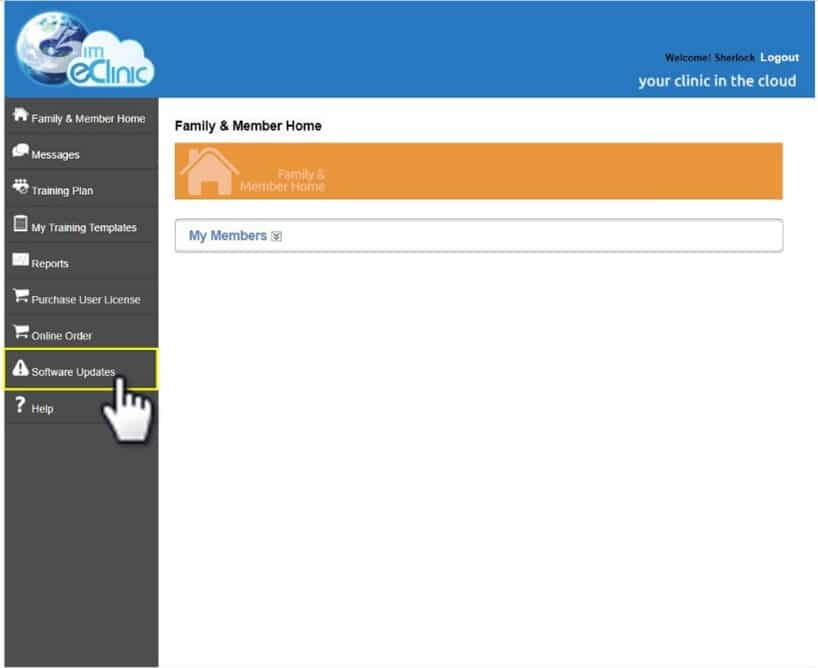
4. You will have two options: Windows or Apple (OSX)- Be sure to select the correct download for your OS
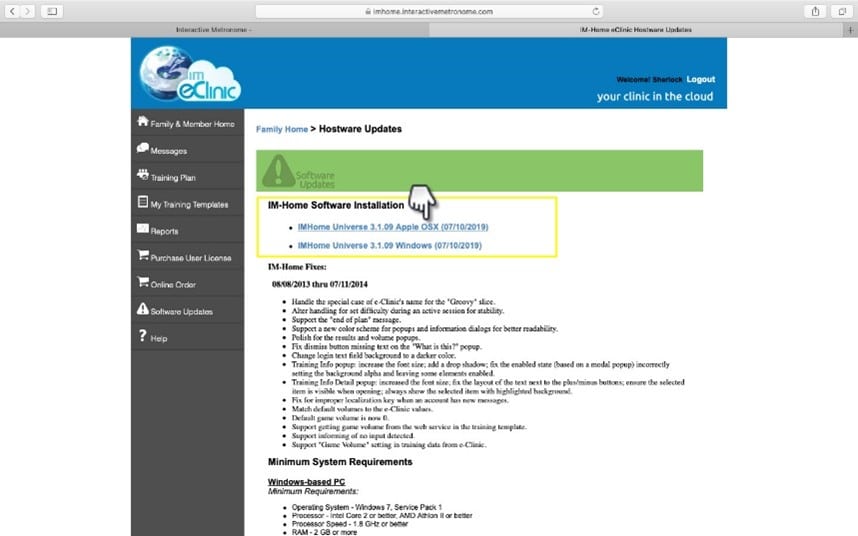
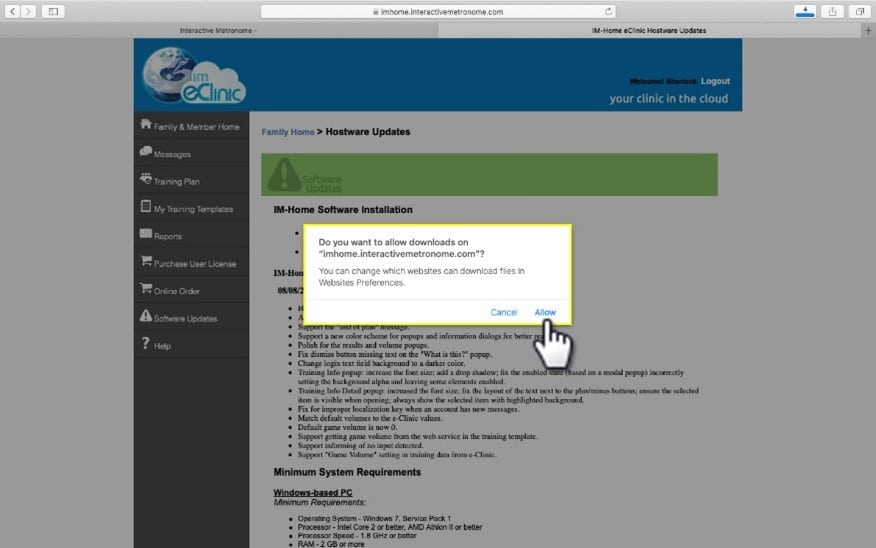
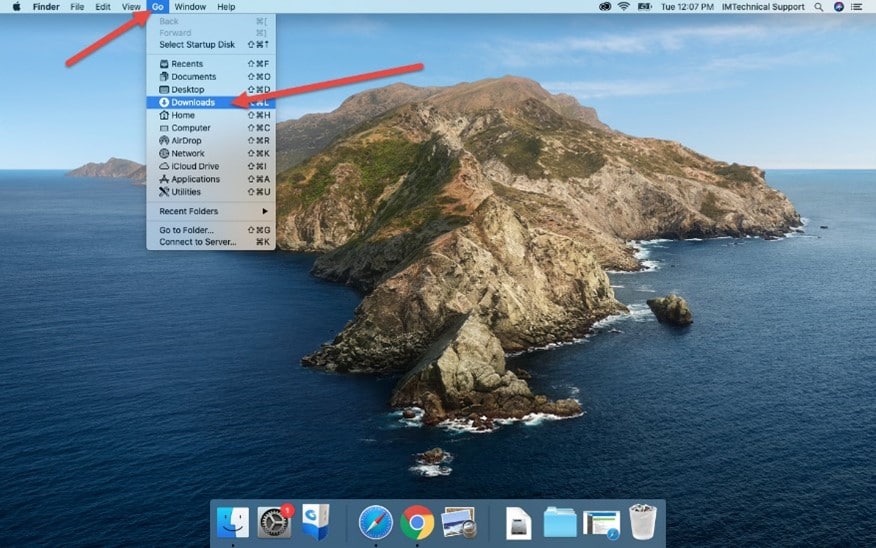
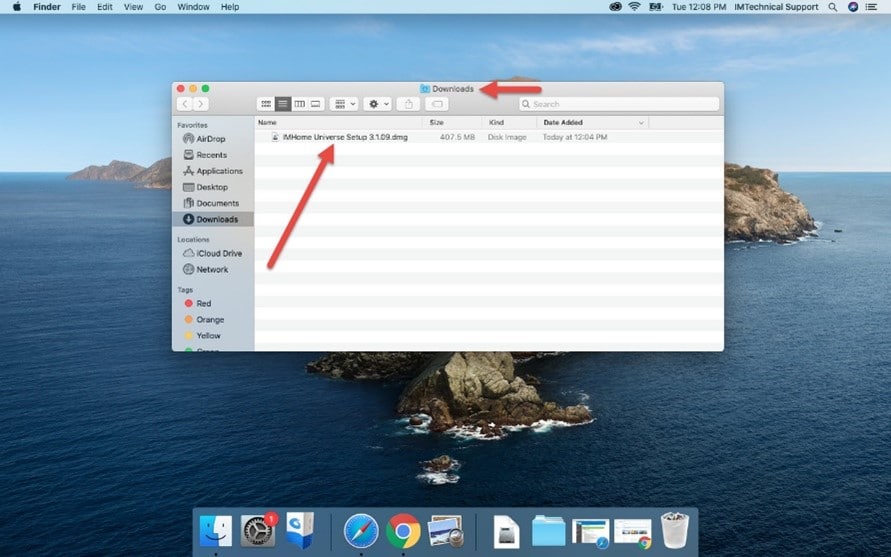
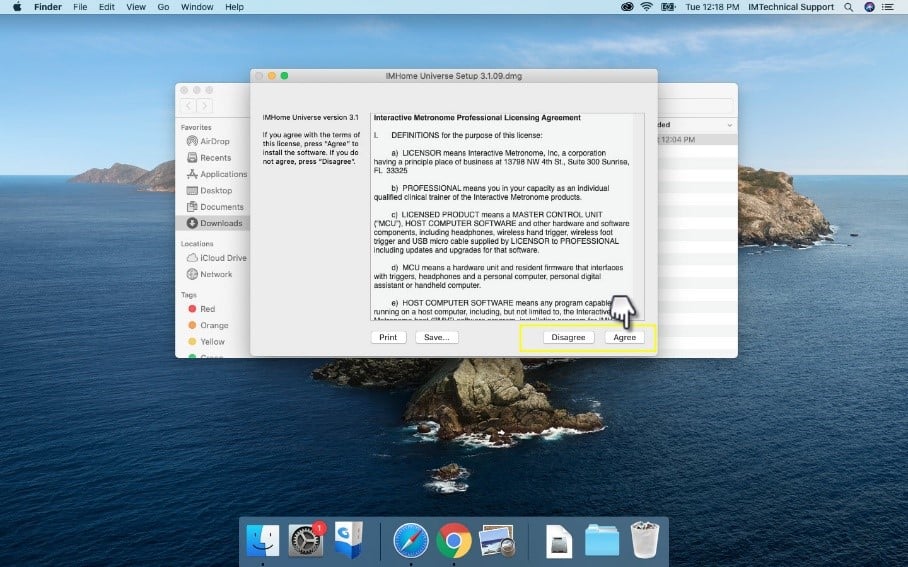
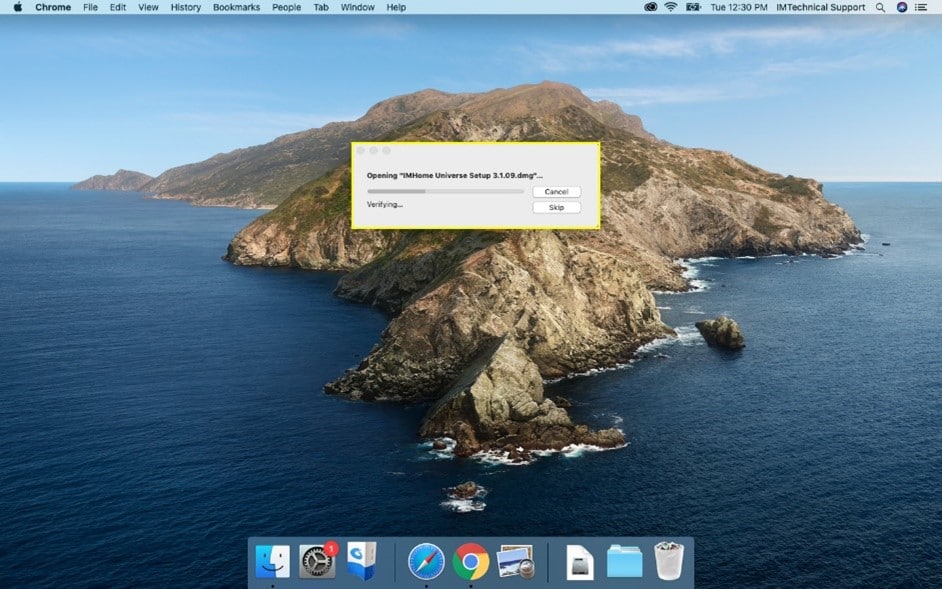
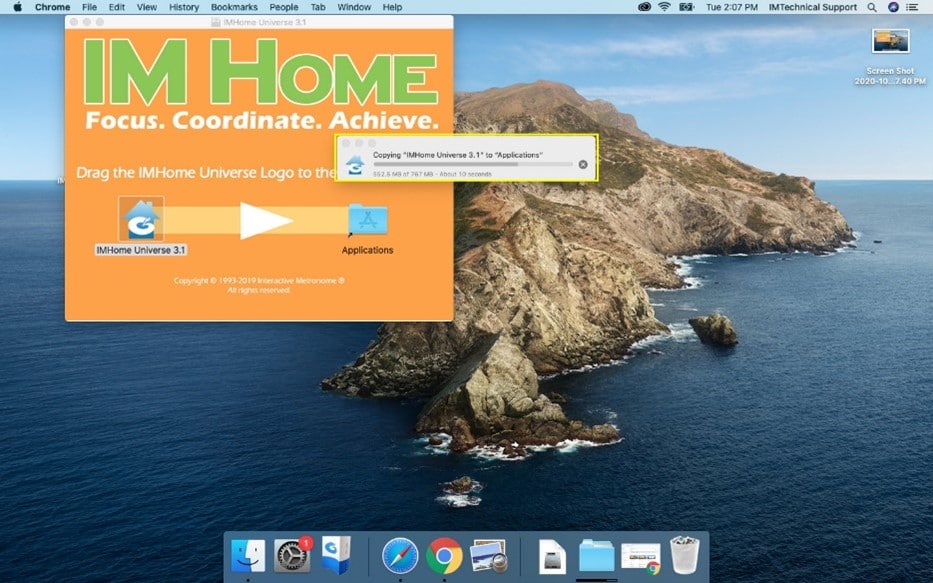
9. The Mac OS will verify the file and then ask you to Drag & Drop the software icon to your Applications folder
The file will now be copied to your applications folder
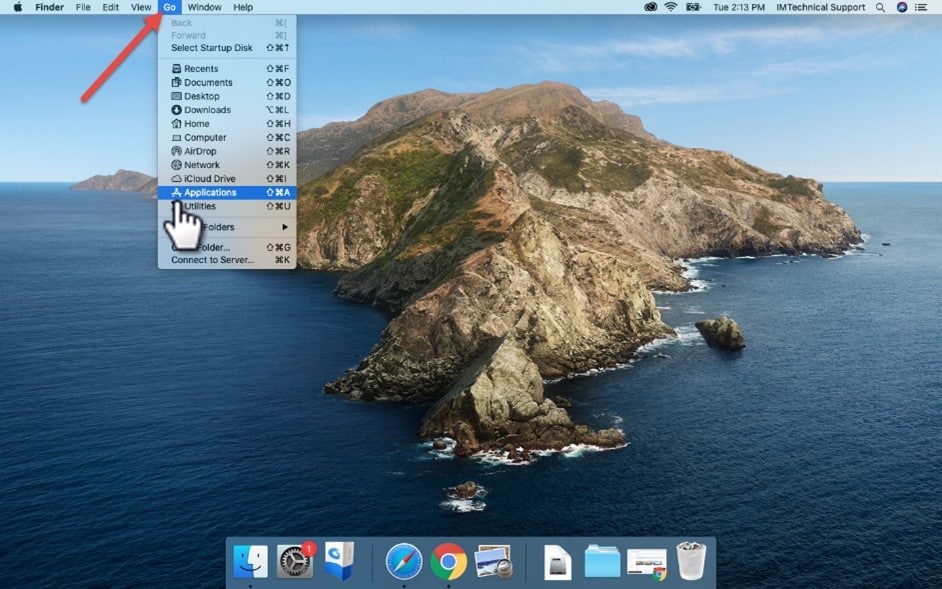
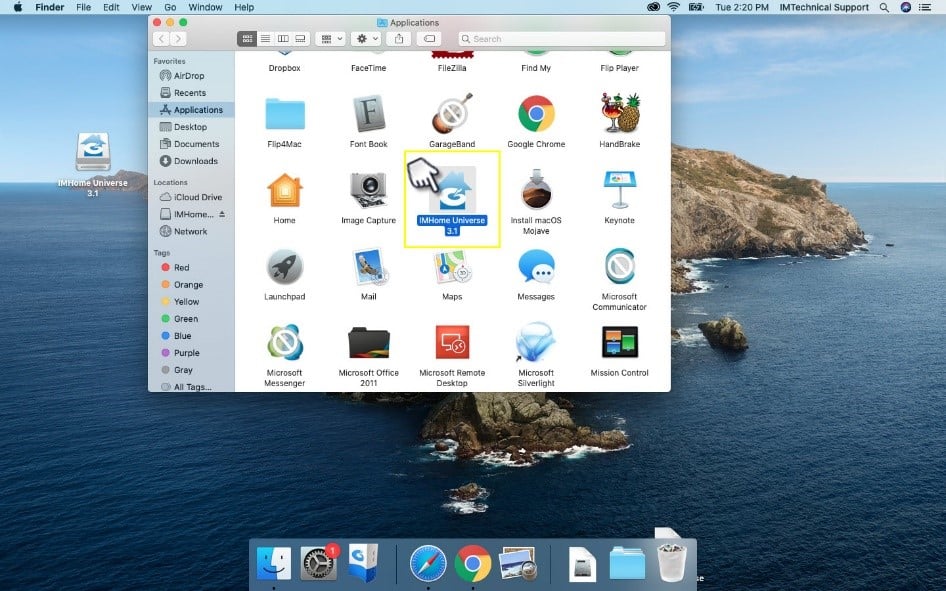
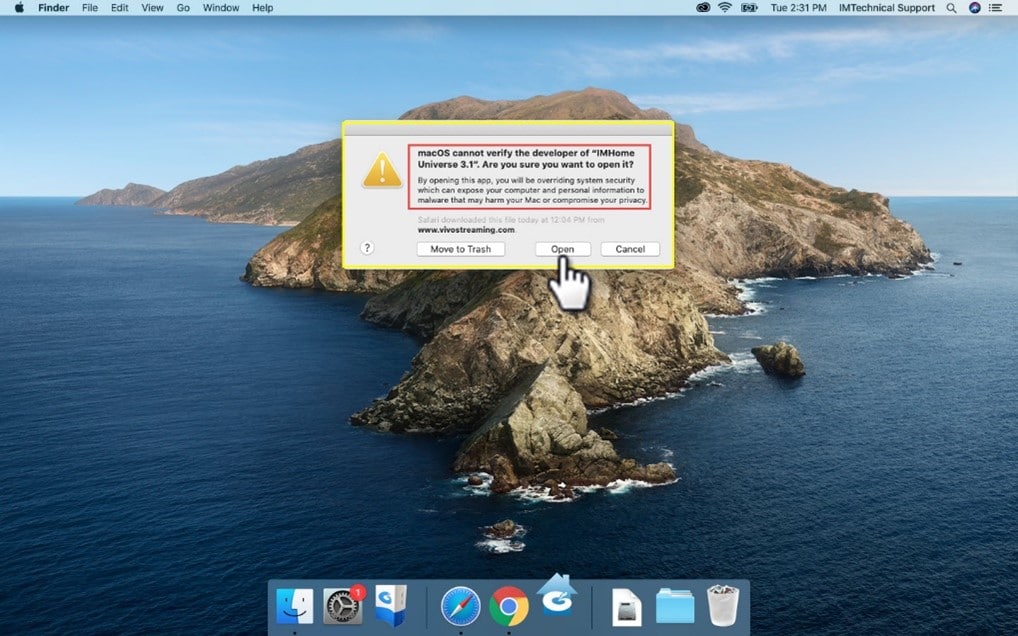
11. Once you have located the IMHome icon, HOLD DOWN THE CONTROL KEY on your keyboard and then Click the IMHome icon as you are holding the control key. You will see a message appear:
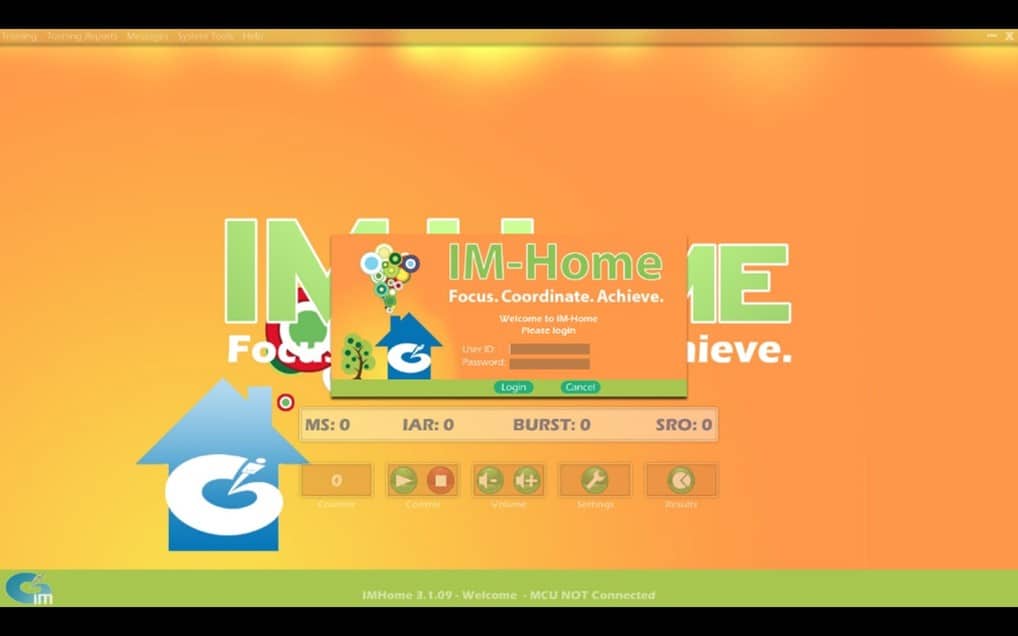
12. CONGRATULATIONS YOU SHOULD NOW SEE THE IM HOME SOFTWARE LOGIN PAGE:
Next steps:
- Authenticate your IM Home user license
- Begin your IM Home Training
Frequently Asked Questions
The maximum number of hours is 400
You must make sure to install “Step 1: DAO 3.5″ for this feature to function properly.
The IMPro uses the default printer driver from the Windows Operating System. No printer driver or setup is required to print from IM’s reports. To resolve, restore the default printer driver for your printer or install an updated driver. If this does not work then contact the manufacturer for your printer
- First close the IMPro Software.
- Start your email application and create a new mail message addressed to
support@interactivemetronome.com. The subject line should read “Provider Training-“. - Type in any issues or concerns you want addressed to the support staff in the text box.
- Click either “Insert” or “Attach” from the message box’s menu toolbar.
- Navigate to the file location and select “OK”.
- The file does not contain previous data with which to compare. By design, in order to generate analysis and comparison reports, there must be previous data (from separate days) in the file to compare to the current session. If the current session is the first time tasks in a particular training mode were performed, then there will not be previous data with which to compare.
- If no LFA tasks were previously recorded, then there is no data with which to compare for the Regular Training Comparison with First LFA.
- Short Form Test tasks performed during the same session will not be adequate for comparison. Only data recorded on separate days can be compared.
This is only an issue for international providers. The “Your locale (location)” setting of “Regional Options” of the operating system is defaulting to a location that supports a different date format than that required by the IM program (d/m/yyyy or dd/mm/yyyy).
Change the “Your locale (location)” setting of the “Regional Options” of the operating system to a location that supports the date format required by the IM program.
- Purchasing hours and loading hours are two different steps:
- Purchase Hours online:
- Go to https://www.interactivemetronome.com/
- On the top right corner, select “Provider Login”.
- Log into the website with your Provider ID and Password. Click the link Can’t Remember User Name and/or Password and an email will be sent to you.
- Select button to “Order Online”.
- Select your facility from the dropdown box and “Select to Online Order”.
- Add the hours to your cart and proceed to checkout.
- Click the button “Authorize IM Hours” at bottom of page to proceed to the authorization page.
- Authorizing Hours once they are purchased and are in your bank:
- Go to https://www.interactivemetronome.com/
- On the top right corner, select “Provider Login”.
- Log into the website with your Provider ID and Password.
- Select the center button to “Authorize Previously Purchased Hours”
- Select your facility from the dropdown box and “Select to Online Order”
- Select the IMPro 8.3 system using the image selection.
- Follow the on screen instructions:
- Make sure your MCU is connected.
- Open the IMPro 8.3 Software.
- Select “Options” from the toolbar at the top.
- Select “Authorize Hours” from the list of options.
- Leave this screen open and type the “Serial Number” and “Pre-Purchase Code” that you see in the software, to the website in their respective fields.
- Add the correct number of hours to be authorized in the top field.
- Press “Authorize Hours” and the website will refresh with your “Authorization Code.
- Enter this code into your software, and press “OK” and the number of hours on your MCU will be adjusted accordingly.
- The battery life for the Interactive Metronome Button Trigger and Tap Mat Transmitter is approximately four weeks.
- Make sure to remove and discard the current battery, and install a new battery into the IM Sensors.
- The Battery size is CR2032.
- Use provided battery instructions for proper removal and insertion of the batteries.
Unplug the USB cable from the computer when the MCU is no longer in use. This will ensure you get the optimum battery life from your batteries.
- Possibility 1:
- The IM Sensors are running low on battery, and will soon need to be replaced.
- Possibility 2:
- The Interacitive Metronome MCU is placed on the desk in such a way that it is difficult for the wireless receiver to function properly.
- Make sure that the MCU in not near the monitor of the computer or laptop, and is positioned towards the front with the lights facing the client.
- Possibility 3:
- Specifically for a Button Trigger: Make sure that the client is hitting the trigger as close to the center as possible. If the extreme edge of the Button Trigger is being hit, it may not register with the system.
- Specifically for a Tap Mat:
- Make sure that there is a solid surface underneath the Tap Mat. Carpeting that is too plush will cause the Tap Mat to register sporadically.
- Make sure that the Tap Mat is at an optimal position, which is at 45 ° from the MCU. The range for the Tap Mat Transmitter is approximately 15 feet, so this can be achieved by pulling back the Tap Mat till the desired angle is reached.
This is most commonly found with technique. The unique design of the Tap Mat allows for full pad sensitivity. It is accurate enough to detect the slightest roll in a person’s foot, as they lift it off the pad. To avoid the double hit, the client must use a marching motion when stepping on the Tap Mat. The client must come straight down on the pad, and lift their foot as quickly straight up as they can. This will reduce and/or eliminate the “double hits” altogether.
- Make sure your MCU has two blue lights displayed on the front.
- If you have a different set of colors for your MCU lights, disconnect it from the USB, wait a few seconds, and reconnect it to your computer.
- If your MCU has no lights displayed, it is not receiving any power from the computer. Connect it to another USB port on the same computer, or connect it to another computer to test its functionality.
- This is a buildup of static in the headphone jack of the MCU. Follow these steps to remove the static.
- Remove the USB cable from the back of the MCU
- Remove the headphone from the front of the MCU.
- Touch the metal tip of the headphone jack with your fingertips.
- Reconnect the headphones to the MCU.
- Reconnect the USB to the back of the MCU.
Other Resources
Business Development Toolkit
Check out all of the business resources available to our Provider network.
Blog
Looking to stay up to date on the latest IM news and research? Subscribe to our blog and never miss a post.
IM Policies
For any questions regarding IM company policies or terms & conditions of use, please check here.


