Virtual Certification Course Materials: Public Course (Version 10.L)
Getting Started
Make sure you complete these important steps:
✅ Complete the Pre-Course Lab prior to your course date
✅ Install IM Pro software and connect your equipment
✅ Download the Course PowerPoint and Additional Materials (no need to print unless you want to!)
✅ Have your trigger + headphones ready for practice
✅ Optional but helpful: Set up a second device for Zoom (tablet/phone/laptop)
💡 Pro Tip: You’ll want easy access to your materials during the course, but you can totally take notes in a notebook instead of printing pages.
IMPORTANT! MUST READ IMMEDIATELY!
If you will be using your own IM Pro equipment (NOT Loaner Equipment) during the course and are on a previous version of IM Pro Universe (9.0 or 9.1), please note this course is taught on our latest software IM Pro Universe 10. If you would like to borrow the IM Pro Universe 10L software, you must provide us the Serial # for your MCU (Blue & White IM Pro box). You will not be able to receive the limited use software download without providing this information.
If you have received IM loaner equipment, you may ignore this step.
Registered Participant's Name
Course Date
MCU Serial #
*NOTE – YOUR MCU MUST BE CONNECTED TO OBTAIN THIS INFORMATION
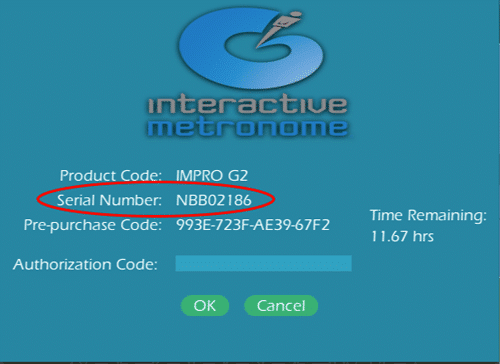
How to locate your serial # from the IM Pro 9.0 & 9.1 software
-
-
-
- Open your IM Pro Software
- Plug in your MCU* (Blue & White IM Pro Box) *Your serial # will not populate unless your MCU is plugged in.
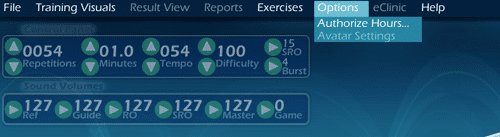
- Select “Options” from the Main Navigation

- Choose “Authorize Hours”

- Your Serial # will Start with “NBB” and Appear on the Next Screen

-
-
-

To ensure a smooth training experience, please complete the steps below in order BEFORE your course begins.
You are not required to print the course materials. These are multi-page documents and can be saved to your computer or tablet for easy access during the session.
If you prefer, you may print them or simply take notes in a separate notebook.
Optional: Two-Device Setup
While not required, using two devices may improve your training experience:
-
Device 1 (phone, tablet, or laptop): Use this to attend the Zoom session
-
Device 2 (laptop or desktop): Use this to run your IM software and connect your equipment
If you only have one device, that’s fine. This is simply an option to make things easier.
Course Agenda
| Total Time | Description |
|---|---|
| 1 hour, 30 minutes *IMPORTATNT: To be completed at least 2 business days BEFORE the course begins. NO EXCEPTIONS | Homework: Pre-Course Lab- Introduction and Science *You MUST complete the pre-course homework at least 2 business prior to the course. This allows time for troubleshooting with Technical Support, if needed. |
| 30 minutes | Registration, Software Installation and Equipment Set-Up Help |
| 30 minutes | Course Begins: Instructor Introduction, CE Disclosure and Meet & Greet |
| 45 minutes | Tech Hour: WebEx, Hardware Set-Up and Software Set-Up |
| 15 minutes | Break |
| 30 minutes | Research, Case Discussion and IM Assessments |
| 1 hour, 30 minutes | Software Features and Software Feedback Tutorial |
| 30 minutes | Lunch Break |
| 1 hour, 30 minutes | IM Assessment, IM Training Phase 1 & 2 Instruction and Labs |
| 45 minutes | IM Training Phase 3 Instruction and Labs |
| 15 minutes | Break |
| 45 minutes | IM Training Phase 4 Instruction and Labs |
| 15 minutes | Closing Thoughts and Post-Test |
| Total Live Course Time: 7.5 hours | *Includes 1 hour for breaks. Does not include registration time. |
| Total Course CEUs: 8 Contact Hours | OnDemand Content=1.5 hours • Live Content=6.5 hours |
Please contact us with any questions, comments, or concerns throughout your certification:
Support Hours:
Monday through Friday
9:00 a.m.- 5:00 p.m.EST
Interactive Metronome, Inc.
1351 Sawgrass Corporate Pkwy STE 100
Sunrise, FL 33323
Phone: 954-385-4660
Fax: 954-385-4674
Clinical Support:
clinicaled@interactivemetronome.com
Education Support:
education@interactivemetronome.com
Technical Support:
support@interactivemetronone.com
1) Pre-course Lab
Watch/Listen to: IM Introduction and Science Module (45 minutes)

Pre-Course materials contain the following files:
2) Equipment & Software Setup
You MUST complete this step PRIOR to the live course date.
You will be using the IM Pro equipment and software during your course. It is imperative you download the software and test the equipment before the live course date. This will ensure the course remains on time with the agenda. Follow the Equipment Set-Up instructions, which can be found in the link below.
Please note, the IM Pro 10.L software requires your IM username & password to authenticate the license. This is located at the top of your registration email.

Please contact support@interactivemetronome.com if you incur any issues or need assistance.
3) Day of Course
Course PowerPoint & Videos

Day of Course Materials link includes the following files:
- Day of Course Powerpoint (PPTX File)
- Day of Course PowerPoint PDF Printout
- Appendix PDF
- Day of Course Videos
Stand with both hands comfortably in front of your torso area and several inches apart from each other. On the beat, clap lightly, and then continue simultaneously moving your hands around in opposite circular motions, allowing them to come together exactly in the middle of the circle on each consecutive beat. Do not stop the motion after each clap, for it should be continuous.
Stand with your right arm hanging down several inches from your right side. On the beat, tap the trigger against your side and then around in a circular motion to tap your side again on each consecutive beat. This motion should be continuous and fluid, not jerky, back and forth, or ballistic.
Stand with your left arm hanging down several inches from your left side. On the beat, tap the trigger against your side and then around in a circular motion to tap your side again on each consecutive beat. This motion should be continuous and fluid, not jerky, back and forth, or ballistic.
Stand facing the foot trigger with both feet a few inches back from it. On the beat, smoothly tap the toes of your right foot on the trigger and then return them to the starting position. On the next beat, repeat this motion with the toes of your left foot. The alternating motions should be continuous for each consecutive beat.
Stand facing the foot trigger with the heel of your right foot planted and the toes hovering slightly above the trigger. Your left foot should remain firmly planted a few inches back from the foot trigger. On the beat, tap the trigger with the toes of your right foot and then return them to the hovering position. Continue this motion for each consecutive beat.
Stand facing the foot trigger with the heel of your left foot planted and the toes hovering slightly above the trigger. Your right foot should remain firmly planted a few inches back from the foot trigger. On the beat, tap the trigger with the toes of your left foot and then return them to the hovering position. Continue this motion for each consecutive beat.
Stand facing away from the foot trigger and a few inches away from it. On the beat, smoothly tap your right heel on the trigger, and then return it to the starting position. On the next beat, repeat this motion with the left heel. The alternating motions should be continuous for each consecutive beat.
Stand facing away from the foot trigger with the toes of your right foot planted and the heel hovering slightly above the trigger. Your left foot should remain firmly planted a few inches away from the foot trigger. On the beat, tap the trigger with your right heel and then return it to the hovering position. Continuing this motion for each consecutive beat.
Stand facing away from the foot trigger with the toes of your left foot planted and the heel hovering slightly above the trigger. The right foot should remain firmly planted a few inches away from the foot trigger. On the beat, tap the trigger with your left heel and then return it to the hovering position. Continuing this motion for each consecutive beat.
Stand facing the foot trigger and a few inches away from it with your right arm hanging down several inches from your right side. Place your left foot with the heel planted and the toes hovering slightly above the trigger. On the beat, tap the hand trigger against your right side, and on the next beat, tap the foot trigger with the toes of your left foot. To keep the motion fluid, sway back and forth. Continue this alternating motion for each consecutive beat.
Stand facing the foot trigger and a few inches away from it with your left arm hanging down several inches from your left side. Place your right foot with the heel planted and the toes hovering slightly above the trigger. On the beat, tap the hand trigger against your left side, and on the next beat, tap the foot trigger with the toes of your right foot. To keep the motion fluid, sway back and forth. Continue this alternating motion for each consecutive beat.
Stand balancing on your right foot while holding your left foot a few inches above the foot trigger. On the beat, tap the toes of your left foot on the foot trigger and then return them to the starting position. You may bend the knee of the tapping foot but do not bend the ankle. Try not to hold anything unless you lose balance. Continue this motion for each consecutive beat.
Stand balancing on your left foot while holding your right foot a few inches above the foot trigger. On the beat, tap the toes of your right foot on the foot trigger and then return them to the starting position. You may bend the knee of the tapping foot, but do not bend the ankle. Try not to hold on to anything unless you lose balance. Continue this motion for each consecutive beat.